Articles – Basic – Exercise.com

Bone Growth and Youth Development

12-2-16

Adam Boily MS, MATJS, USAW

Here might be the most commonly asked question a strength & conditioning professional must answer to youth athlete parents.

Question:

“Will my 13 year old child (or younger or teenager) have a stunted growth from lifting weights?”

Answer:

It depends. It depends if the athlete is exercising biomechanically correct or not. Stunted bone growth may occur when the open growth plates located at the ends of bones become damaged. Damaged open growth plates can happen for various reasons, which include an injury from sport or poor exercising technique. For example, if a 12 yo athlete playing soccer sustains a trauma to the knee in a soccer game, he/she could incur growth plate damage around the knee. Another way an athlete can sustain growth plate damage in the knee would be biomechanically incorrect weight-bearing exercises. Say a 10 yo athlete is front squatting and during every repetition their right knee caves in with a valgus moment. If an expert S&C coach is not there coaching the athlete out of these poor mechanics, overtime knee growth plate damage might occur before the plate close. However, most youth athletes will not experience growth plate damage from training or in sport as long as qualified professionals are monitoring exercises.

It’s important to develop youth athletes through sport and training participation because their young bodies and minds are like sponges and we want them to learn exercise technique and proper nutrition before they may learn bad habits. To avoid growth plate damage in young athletes, their training should be focused on light loads (body weight or light weights) so they can learn the intention of each exercise. When an athlete is below the age of 13 yo, they benefit tremendously from learning proper biomechanically correct exercise techniques and become strong through a long amount of isometric exercises. Before weight is increased for the youth athletes, volume and isometric times should be increased substantially so proper technique is reinforced and the athlete naturally performs exercises biomechanically correct. These exercises may include squatting, pressing, pulling, running, and jumping. Typically we find that athletes starting to exercise around 5-8 yo will become strong enough and biomechanically adequate for progressive resistance training when they reach 14 yo. Also, at this point, the growth plates are still open/undamaged and these athletes will start peak height velocity (puberty).

Surges of hormones, including testosterone, are beginning to flow through the athlete naturally. This is the ideal time for athletes to exercise with heavier resistance and advanced plyometrics. With the surge in hormones and advanced strength and conditioning volume combined, the athlete will experience hypertrophy of lean muscles, increased bone density, length, and girth as well as other bodily tissue growing. Sometimes, an athlete will grow rapidly and the muscles become stretch so fast that the brain has a hard time communicating to or controlling the muscles during this growth. In this case the athlete will become clumsy or uncoordinated (you may have this seen this with young basketball players). However, if during this time that same athlete were in a proper training program, especially involving isometric exercises (pillars or infant squats), their muscles would remain strong and would not become as clumsy. During this time of puberty, the athletes’ recovery time will be much more rapid allowing them to endure progressive amounts of volume from day to day and week to week.

To some it all up, participating in unsupervised training or with unqualified coaches could potentially put youth athletes in scenarios that could damage growth plates. Again, few youth athletes experience stunted growth and damaged growth plates and these rare occurrences from improper movements should not detour youth athletes from exercising young. The benefits a youth athlete receives from intelligent training and sport play are far too valuable to be passed up. There are many brilliant minds and a plethora of scientific research that shows bone growth will be improved (sometimes more than genetics had planned) rather than stunted through biomechanically sound youth training. Depriving a youth athlete from proper training before, during and after their peak height velocity is doing that athlete a major disservice and could potentially cause that athlete to never reach their full genetic potential.


*For more information join our BPSU and go research and study the work of Istvan Balyi (an expert in long term athlete development).

TAKE YOUR CARDIO INTO THE “ZONE”

TAKE YOUR CARDIO INTO THE “ZONE” –

THE 90-MINUTE PER WEEK ULTIMATE FAT-BURNING WORKOUT


BPS 6-Zone System – The key to maximizing Fat Loss Without Over-Training


Pete Bommarito, MS, CSCS, USAW, MATCS, MAT JS


  1. Quality over Quantity
  2. Convenient Training Schedule for Hectic Lifestyle
  3. Efficient workout that provides most “Bang for Buck”


As trainers, we are constantly fighting logistics. Logistics of how often a client can attend training sessions, the session length, and the maximum intensity that can be sustained each session. Hence, we are always trying to find the most efficiency for the allotted time. Most group fitness classes, Cross-Fit, or even athletic speed/conditioning sessions do a great job of working within a key energy system that make quick gains. However, if you limit your training to one or two energy system zones (even the key zones), you can never make maximal gains; and you will never be as efficient in these key zones. The BPS 6-Zone System allows for ALL of the cardio zones to be taken into account over a training cycle – obviously emphasizing certain zones, but never leaving anything out. This can be implemented into athletic programs or for regular fitness clients or groups. That’s the most intriguing part of this 6-Zone System – it can really apply to any fitness client or group at any level. The difference will be the mode of training or exercise equipment and overall intensity within the session. Also for athletes, the frequency of each zone per month-microcycle can change dependent on the sport and off-season phase.


Looking at the most efficient ways to maximize Cardiovascular Fitness, a full understanding of ALL of the energy systems is crucial. There has been an abundance of research and applied methods that is dedicated to the holy grail of “fat loss” and “toning”. The main thing to think about when breaking down research to put into training protocols is to understand the big picture. Research has led to a number of various concepts such as “High Intensity Interval Training”, “Fat Burning Heart Rate Zones”, “Power Endurance”, etc. All of these are great concepts, but only really work within a limited amount of energy system zones. While all of these concepts are good and effective, a training program can never leave out the big picture – maximize efficiency of ALL of the energy systems in a given microcycle, just have a specific EMPHASIS on a system that is personalized towards the ultimate goal and purpose.


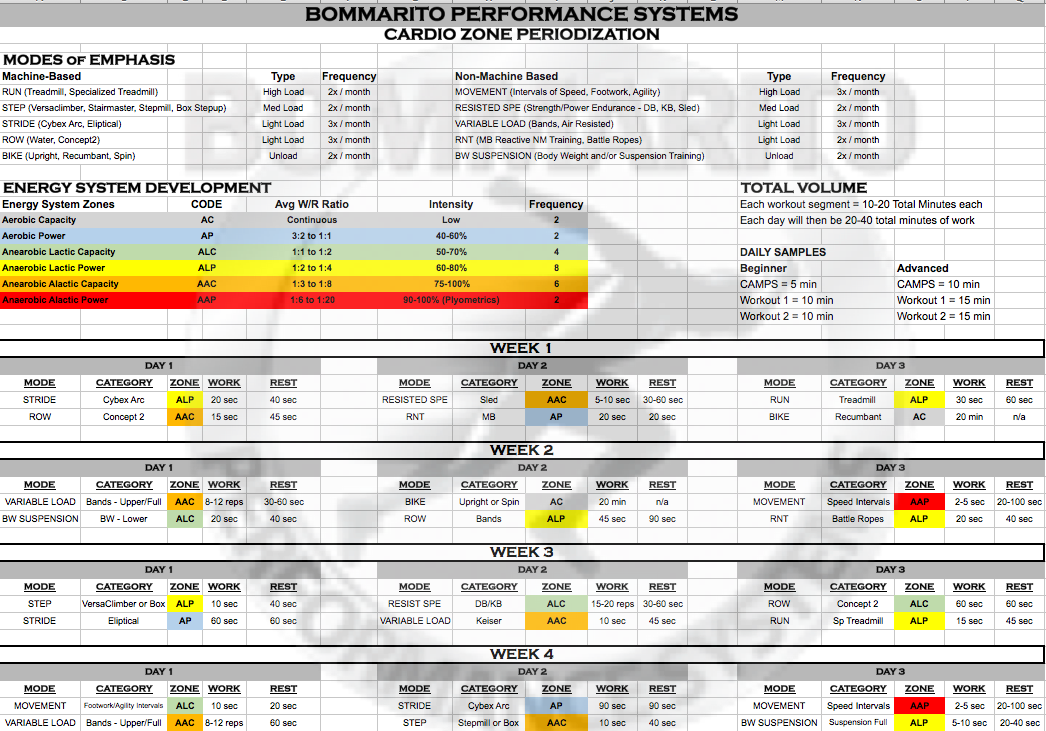
Breakdown of the Energy System Development (ESD) Zones

Aerobic Capacity (AC)

  • Average Work:Rest Ratio – None, it’s more of a consistent long slow distance
  • Intensity – Low
  • With presence of oxygen
  • Improve peak oxygen consumption and associated cardiovascular functions to support endurance performance
  • Developing the “aerobic base”

Aerobic Power (AP)

  • Average Work:Rest Ratio – 3:2 to 1:1
  • Intensity – 40-60%
  • With presence of oxygen
  • Maximize the efficiency of the aerobic base via longer interval training
  • Maximizing the efficiency of the base

Anaerobic Lactic Capacity (ALC)

  • Average Work:Rest Ratio – 1:1 to 1:2
  • Intensity – 50-70%
  • Without presence of oxygen
  • Lactic – anaerobic glycolysis will be the primary energy source utilized
  • The shift of raising the the tolerance to lactic acid accumulation; the beginning of raising the Lactate Threshold (LT)

Anaerobic Lactic Power (ALP)

  • Average Work:Rest Ratio – 1:2 to 1:4
  • Intensity – 60-80%
  • Without presence of oxygen
  • Lactic – anaerobic glycolysis will be the primary energy source utilized
  • Raising the Anaerobic Threshold (AT) (the point at which lactate is produced faster than it can be removed)

Anaerobic Alactic Capacity (AAC)

  • Average Work:Rest Ratio – 1:3 to 1:8
  • Intensity – 75-100%
  • Without presence of oxygen
  • ATP-PC phosphagen systems will be the primary energy source
  • Maximize the ability to execute high power output exercises over a set period of time

Anaerobic Alactic Capacity (AAP)

  • Average Work:Rest Ratio – 1:6 to 1:20
  • Intensity – 90-100%
  • Without presence of oxygen
  • ATP-PC phosphagen systems will be the primary energy source
  • Raise the overall threshold for overall power output


Most people that do endless minutes on cardio machines are working in the AC and AP zones (yes, even if it’s done on the “interval” setting). Most group fitness classes work between AP, ALC, and some ALP (the more advanced classes). Cross-Fit is primarily the “Power Endurance” concept of ACC and AAP. The High-Intensity Interval Training (HIIT) is the concept of maximizing the “fat burning zone” – primarily in the ALP to AAC zones. As previously stated, all of these are effective. However, like anything in the fitness world – it’s always best to think in terms of overall periodization and building blocks.


Of course the ultimate “fat burning zone” lives in ALP and ALC. Hence why you see the overall breakdown of the BPS Zone microcycle feature more than half of the overall volume within ALP and ALC. However, if you want to maximize the efficiency of each zone, you have to be efficient in all zones.

Implementing the Zones into a Specified Mode

This is where it gets interesting – motivating and coaching the clients to express the proper intensity in the assigned Zone. Specifically the most challenging will be to train at maximal or near-maximal intensity in the Alactic Zones. Note in the chart many of the AAC and AAP are very short bursts with a work to rest ratio assigned as in the chart above.


An example is Week 1, Day 1. Note it’s a Concept 2 Row machine with a work to rest ratio of 15 sec on and 45 sec rest (in this case, recovery). This is near-maximal intensity (basically go as hard as possible) is for 15 seconds. Then keep rowing, but go at a lighter intensity and slower pace for 45 seconds. Then continue to repeat these intervals for a given amount of time (as stated below in the breakdown – 10 minutes for beginners, and 15+ minutes for advanced. The key is to execute maximal intensity during the 15 seconds each bout for the entire duration of the workout. Obviously if your executing 15 total bouts, the first 15-second bout (maximal) will be more intense than the fifteenth 15-second bout (near-maximal). However, your intention is to move the row as fast as possible; even though the power output might be near maximal.


All of the intentions that need to be reflected by a specific intensity are shown in the chart (low, 40%, 50%, 60%, 75%, 100%, etc).


Heart rate monitors are an excellent mode to measure intensity and recovery over time – and should be recorded. For example above, the first time the 15s/45s system is performed, it will get the heart rate to a certain high percentage of max heart rate. And there will be a certain time that it takes the heart rate to get back down to resting at the completion of the workout. If this is 15s/45s is repeated at a later time, and it’s compared to the first workout:

  • More intensity should be executed for the 15s work bouts for the second workout
  • This increased intensity should be able to be done at a lower heart rate during the second workout (even though it will still be a high percentage of max heart rate)
  • The heart rate recovery will get back down to resting quicker after the second workout

Just like any style of training – records of progression is the key to ensure proper overload without overtraining.


The Monthly Breakdown

  • Microcycle – one month (4 weeks)
  • Approximate training volume – 3 days per week
  • 12 total workouts
  • Workout length
    • Beginner – 10 min Zones, 20 total minutes per day
    • Advanced – 15-20 min Zones, 20-40 minutes per day
    • 1-2 hours per week; 4-8 hours per month
  • Two Zone segments per workout
  • 24 total Zone segments per month breakdown
    • AP – 2 total Zones
    • AC – 2 total Zones
    • ALC – 4 total Zones
    • ALP – 8 total Zones
    • AAC – 6 total Zones
    • AAP – 2 total Zones


The Variations

The first thing to consider is the equipment and space you have access to. In an ideal world, you want to provide as much variety as possible. The variety should be machine based and non-machines. Machines can be very effective, as many machines greatly reduce joint loading (overall efficiency without overtraining and/or unnecessary wear on the joints). However, movement patterns can greatly enhance the overall intensity of the zone.


Notice that in the BPS rotation system, there are about 5 different categories of “machine” based modes:

  • Run – treadmills and specialized treadmills
  • Step – Versaclimber, Stairmaster, Stepmill, Box Stepups
  • Stride – Cybex Arc, Eliptical
  • Row – Water, Concept2
  • Bike – Upright, Recumbent, Spin


There are also 5 different classifications for Non-machine based modes:

  • Movement – intervals of speed, footwork and agility
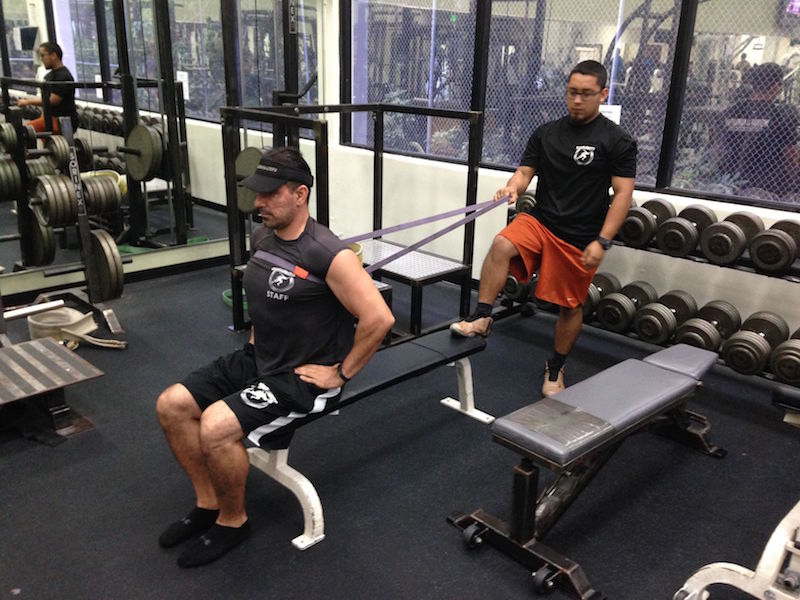
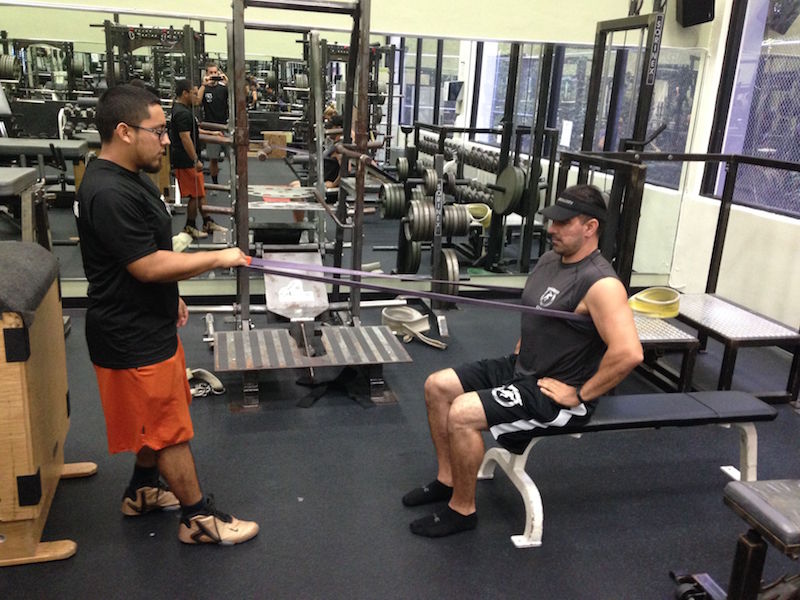
  • Resisted SPE (Strength/Power endurance continuum) – DB, KB, Sled
  • Variable Load – Bands, Air Resisted (Keiser)
  • RNT – Reactive Neuromuscular Training with MB, Battle Ropes
  • BW and Suspension – body weight exercises in place or slow moving (like squats and lunges; Suspension Training (TRX)


Note in the chart, there is a frequency of total number of times in the given month microcycle. Each mode classification will be 2-3 times in the month. Consistently CHANGING THE STIMULUS will have a tremendous impact on getting clients to exceed a training plateau. It also keeps peaking the interest levels of clients because workouts will not become stale. However, it’s also extremely important to keep in mind that clients have to get better at a specific mode of stimulus. Don’t change the mode too often that they can’t actually show improvement.


The Final Step of Advancement – Incorporating Strength and Power

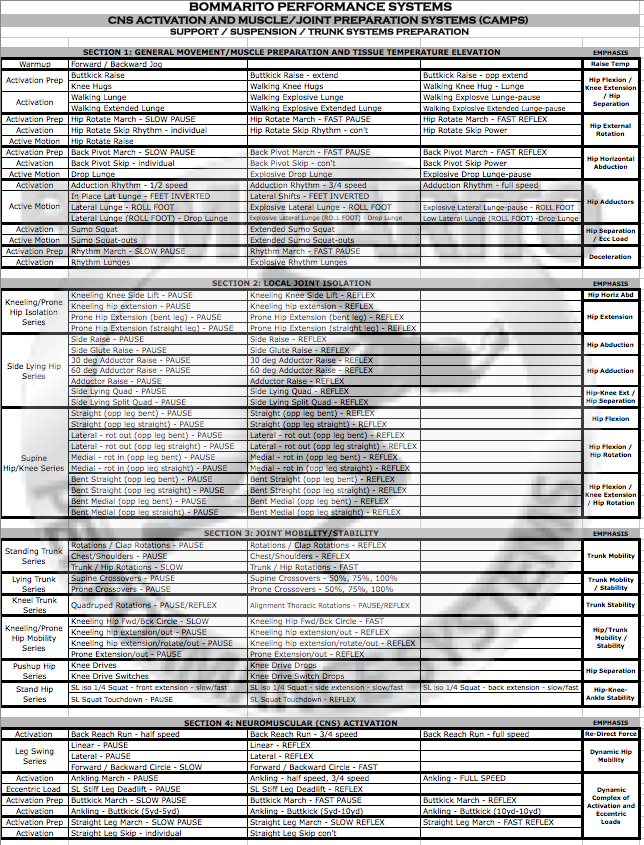
This is really the most important step, especially for any clients or athletes that are above the beginner level with regards to training. As there are 6 different energy systems, there are also 6 different variations of strength and power with regards to resistance training. It should be periodized as the ESD systems into a given microcycle. And, most importantly – it should be incorporated immediately after the ESD cycle. So a given day might look like this for the advanced client/athlete:


  1. CAMPS – 5 min
  2. ESD Zone1 – 10min
  3. ESD Zone2 – 10min
  4. Weight Room Zone 1 (Primary Complex 1) – 15min
  5. Weight Room Zone 2 (Primary Complex 2) – 15 min
  6. Auxillary Strength Complex – 5 min


In addition, consistently rotating between the “big 6” in the weight room:

  • Absolute Strength
  • Stabilizing Strength
  • Strength Endurance
  • Speed Strength (and all of its components to build the base of Power)
  • Power Endurance
  • Power


Note that some of this is addressed in the “Cardio ESD Zones” outside of the weight room like SPE (strength endurance and power endurance continuum with KB, DB, and/or Sleds). However, it needs to be addressed in the weight room as well – just not on the same day.


The great thing about this style of “back-to-back” type of workouts is that you elicit fat burning enzymes by working in specific ESD Zones. Once you stimulate this type of response, you weight room work will be much more efficient, in addition to the fact that you will continue to burn fat in the weight room portion. You will also prep the tissue much more efficiently during the ESD zones that will have a tremendous benefit in the weight room portion. As always, don’t think of it as a “warm-up”. Think of the CAMPS and ESD zones as stimulating the CNS, increasing the threshold for absorbing and re-directing force, and raising tissue temperature – all of which will make the weight room sessions more efficient.


Screen Shot 2016-06-30 at 3.45.58 PM

RUNNING BACK SPECIFICS BALL CONTROL AND LOW CHANGE OF DIRECTION

Any Running Back needs to be able to easily and fluently switch the ball from one arm to the next with ease. They also need to be able to stay low on change of directions, and change directions on a dime.

This drill first and foremost focuses on ball control. Note how our NFL RB clients Malcolm Agnew, Nick Hill, and Aaron Ripkowski moves throughout the drill. The ability to change hands is a trainable effect, and note how this drill forces the player to change arms efficiently.

The next focal point is staying low on changes of direction. Note with the cones as a target just focuses on bending at the knees with an upright torso position. This is a pure endurance drill that will train the muscles of the hips and legs in deep bending positions.

Finally, the changes of direction are sharp and crisp. Note the “positive” angles of the hips, where the emphasis is placed on the inside edge of the outside foot. This is essential to performance on the most difficult cuts a RB can make – specifically the “jump cut” that success is dictated by an athletes ability to get low and dip the inside shoulder – in almost the exact same angle as seen on each cone cut. The deceleration step off the outside edge of the inside leg sets up this hard change of direction off the outside leg. Perfect drill for utilizing both edges of the feet at extreme angles.

3 Rules for Youth Athlete Speed Development

Adam Boily MS, MATJS, USAW

3 Rules for Youth Athlete Speed Development

  • The Structure Rule

CAMPS – Before any training sessions, it is always important to have the structure of the training session outlined for maximal efficiency to maximize adaptations.  First, we need to increase the threshold ability of accepting and redirecting force for the ankles, knees, hips, trunk, and upper extremities.  This means, a well-designed CAMPS is vital for ensuring an athlete is prepared to execute the planned work for the day.  For example, start with SSP and progress from isometric modifications to full reflexive movements.  Once the base of support for the body is strong and tissue temperature is elevated, progress into SST that is skewed to prepare the muscles related to the planned movement or exercises of the day.

Application/Technical/Application – After an appropriate CAMPS muscle preparation, it’s recommended that the athlete begins the planned work with application first.  For instance, if the goal for the day is to increase the athletes ability to perform forward mutli-directional cuts (similar to a wide receiver in American football) we would begin by sprinting forward full speed then cutting diagonally at a 130* angle.  During the execution of the movement the coach can start to identify which aspect for the run and cut needs improvement from various vantage points.  After, 10-15 minutes of continuous application work, the coach can teach athletes a technical drill that is most appropriate for improving the application for the day.  For example, if more than 50% of the athletes in a group or training session are having issues executing an outside edge forward multi cut, the coach may elect to have the entire group perform the carioca quick step technical drill.  This drill is designed to overload the ground contact force on the outside edge of the foot and inside of the opposite foot.  Once the athlete has performed the drill 1-2 times correctly each direction, it is best to have the athletes finish the session with the same application forward cuts the sessions began with or progress to more difficult modifications of the forward multi movement.  A form of progressed forward multi cuts application could be visual and audible commands that force the athlete to cut based on an outside stimulus rather than a predetermined pattern.  If the most appropriate technical drill has been selected for a given group of athletes, more times than not, the second or final round of application work will be noticeably more efficient.  Progress the difficulty of the movement based on the athletes’ response overtime within the structure of application then technical work then application.

The end of the session can be sport specific by having the athletes sprint or do an application that closely resembles movement within their sport.  For example, a baseball shortstop player may choose to perform a sprint from a baseball-stealing stance.  Perhaps a tennis player will finish his or her session with lateral shuffles with change of direction to lateral shuffles.  Have a well planned structure and don’t stray to far from the planned volume of application work.

  • Technical Rule of Thumb

A very common technical drill utilized with BPS is our variations of the wall drill.  We chose either a linear wall drill, lateral wall drill, back lateral wall drill, etc.  It is typically progressed from isometric single switches to continuous reflexive rapid fire.  It is important that the younger youth athletes and/or beginners remain on isometric modifications.  For example, the isometric lateral wall drill is designed to overload and increased the foot’s abilities to accept and redirect force off of its inside and outside edges.  The fastest way to build a strong foundation of edge strength is to isometrically hold the lateral wall drill for 1-3 seconds facing each direction by switching the legs up and down 2-4 times.  Most growing youth athletes initially lack the strength in the edges of their feet and lack the truck stability necessary to expertly perform the lateral wall drill with reflexive rapid fire.  Technical drills should be performed only for a few reps during a given session since they are very taxing on the central nervous system.  Technical work is important for increasing thresholds for bodily structures and functions but must be supplemental to application work.  If technical work is consuming the majority of a given session, the benefits will not be realized during the application movements.  Technical drills are necessary to quickly improve application movements necessary for sport.  Always remember it is not appropriate to teach people how to form run with technical drills.  However, it is appropriate to improve movement efficiency by overloading and adapting muscle tissue.

  • Volume of Work Rule

Youth athletes require large amounts of volume.  An appropriate work to rest ratio should be around 1 to 2 or 1 to 1.  60-70% of a given session needs to be application work.  30-40% should be CAMPS, plyometrics, and technical work.  For example, on a backward multi-directional day, the first 10 minutes of the session should be specific CAMPS designed to prepare the body for backward multidirectional movements.  After a minute water break a good 10-minute plyometric routine should be completed and progressed based on skill level.  Again, a short water break may be given before the athletes start the first 15 – 20 minutes of application drills (i.e. back pedal or back angle pedals).  Chose between 2-3 appropriate technical drills while keeping in mind total technical work time should not exceed 10 minutes within this hour-long session.  Supper-setting 2 minutes of technical work with the application 3-4 times per session seems to elicit the best response for our youth athletes.  Finish the session on application for the last 15-20 minutes for a total of 30-40 minutes of application work during a given session.  Youth athletes respond and adapt well to large amounts of volume work since hormones are higher during that time of development.  Recovery and growth improvement opportunities are optimal if training structure, technical work, and volume levels are most appropriate.

10 KEYS TO BECOMING A SUCCESSFUL PERFORMANCE COACH/TRAINER

3fa8799

  1. Coach the INTENTION of exercise when training clients/teams/athletes; as opposed to “answering questions” or “counting reps”.

This is the single most important aspect of being an actual TRAINER or COACH, as opposed to a MONITOR. Too many times coaches get caught up in writing a “perfect individualized plan” for a client or a group of clients. Then they get caught up just “answering questions” of what each exercise is with clients, as opposed to actually COACHING the reps of the exercise.

Sell clients on what’s truly important – vary the exercise to fit the client; DON’T change the exercise to fit the client. The coach/trainer should spend quality time coaching the different INTENTIONS of the variations of the exercise, and assigning proper loads for each client – which is really pure individualization.

  1. Give respect to get respect.

Respect your craft by being highly educated to gain the respect from your clients, assistants, employees, interns, etc. Highly educated goes BEYOND just your “degree and certification.” It’s constantly pushing the limits of your own knowledge of current research and literature and presented materials, how to apply it, and taking steps to “re-direct” your applied sciences into the research and academic communities.

In terms of your clients, teams, and/or athletes – they respect your knowledge above ALL. And most importantly – increase your ability to APPLY this increased knowledge. If you don’t respect your profession enough to stay on top of current educational platforms out there, you will never gain the respect from your clients/teams that is required for you to be truly successful.

  1. Don’t ever forget the root of this profession – INCREASE STRENGTH.

This is not a “meathead aspect” of increasing squat and bench. Which categories you choose to focus on with your clients/athletes is the true individualization of your program. However, the theory is the same – maximize as much strength as possible. Have an understanding of each of the variables – INCLUDING which ones apply to athletes and general population:

  • Absolute Strength – both, INCLUDING senior population
  • Speed Strength – both (believe it or not, speed strength is essential to general population and overall general fitness)
  • Dynamic Eccentric Loading – typically athletes only
  • Reversal Strength – athletes only
  • Stabilizing Strength – clearly both
  1. Start your career on the “7-10 year rule”.

One of the most successful businessmen I’ve ever had the pleasure of working with gave me a speech one time that I will never forget. “For the first 7-10 years of your career, base all of your experiences and employment choices on one factor – work for, and under, people that have proven to be successful in your chosen industry.” I reflected on every choice I made from day 1 – Every single choice I made was motivated by the fact that it provided me with a unique opportunity to LEARN and GROW as a coach, a professional, and finally an entrepreneur. I literally did this for about 7-10 years. Learning about the backgrounds of so many colleagues that are actually SUCCESSFUL made me understand every single one of them followed a very similar 7-10 year plan – whether it was planned or not.

Even if you are having initial success as a young business owner or head strength coach at a small high school or university: if you haven’t learned how to effectively MANAGE people, systems, finances, schedules, profit centers, administrators, sports coaches, athletic directors, etc., etc. – your success will be short-lived. Success comes with extensive experience – and the right guidance comes from the right people. There’s really no way around it and no shortcut through it.

Untitled

  1. Read, interpret, apply, RE-DIRECT research and literature

This could honestly be the most important aspect of this list. Note the divide in the industry. One side of the issue is the hard-core “research crowd” that believes that EVERYTHING MUST be “proven” in a laboratory setting before it can be applied. The other side of the issue is that hard-core “application trainer” crowd that believes “application is always ahead of research.” Therefore, success is done by trial and error, and research doesn’t have any place in “real life.”

Our approach is actually fairly simple:

  • Review research, clinical studies, and application based literature (that is hopefully based on research and clinical studies)
  • Develop application methods of YOUR understanding of the literature
  • Apply the methods to your clients with SPECIFIC and DETAILED documentation on the response and results
  • PRESENT (“re-direct”) your application methods (and the various responses) back to the scientific community to further enhance the research

Note that technically both sides have great points – but both sides need to have a medium ground with their way of thinking. READ research and literature and DEVELOP an applied interpretation – but ALWAYS RE-DIRECT. Don’t focus too much on either side, and ALWAYS play a role in the progressive bridging of the gap.

1462886961-236x236-bpsu-logo2

  1. Practice what you preach

You will always have certain principles that you believe in from resistance training, cardiovascular, movement, recovery, nutritional, and preparation aspects. You instill these principles into your clients/athletes on a daily basis. The best way to learn and perfect the teaching of these aspects for compliance is to practice what you preach. Not following the EXACT protocols and programs – but by implementing the philosophy into your overall fitness profile.

  1. For Movement/Speed Development, understand basic muscle physiology to construct your progressions. Eliminate made-up concepts like “teaching drills”, “form running”, and “muscle memory”.

This is one of THE definitive concrete principles that truly defines the Bommarito Performance System and Bommarito University brands. Breaking down to the ultimate simplicity, muscles CONTRACT, RELAX, and they have a THRESHOLD. As performance coaches, we need to enhance:

  • The ability for the muscles to neurologically contract and strengthen them in this “aligned state”
  • Optimize the muscles ability to relax appropriately
  • Raise the threshold for various levels of force across the muscles at various speeds

TRAIN THE MUSCLES, DO NOT ATTEMPT TO “TEACH” OR “RECREATE” MOTIONS IN SPORT.

Consistently having this though pattern will allow for more efficient planning of:

  • Volume differential between technical mechanics and full speed application
  • Overall volume of full speed application over a mesocycle
  • The plyometric progression which can significantly increase the threshold towards full genetic potential
  1. Learn the psychology aspects of your clients AND target markets
  • Professional athletes – within 10 seconds be able to fully explain WHY you are implementing a drill and/or exercise and be able to speak simplified enough that they understand but not dummy it down too much that they get offended
  • Collegiate/high school athletes – be able to individualize the training to reach their end goals; but NEVER sacrifice the competitive atmosphere and intensity of the session
  • Middle school athletes – EVERYTHING on military-style timing systems and control.
  • General population – hard core intense coaching during the work; EDUCATE AND EXPLAIN on the brief rest (whether they ask for it or not). Don’t “be their friend and counselor – EDUCATE. It’s the best friend they will ever have
  1. Get educated/trained in the basics of neuromuscular therapy and/or biomechanical screening/evaluation techniques from DAY 1 of your career.

Having full understanding of neuromuscular therapy will allow for many important aspects of knowledge that is essential to becoming a high-level professional coach – including, but not limited to:

  • Anatomy – different aspects that relates to ALL integrated function from various joint positions
  • Joint motions
  • Joint control
  • Isometric contractions
  • Isolation of planes of motions
  • Force application
  • These will always lead to becoming a better coach – especially in the weight room. Remember that you are teaching the INTENTION of the lift – NOT teaching “form”. The more training and knowledge you have on all aspects of joint and force – the better you can understand how to individualize and coach intention.
  1. LEARN BUSINESS!!!!!!!! It applies EVERYWHERE.

Business in this industry is centered around one important factor – MANAGEMENT. There are many forms of management, but elevating yourself from a great coach/trainer into an actual professional is management. Management of:

  • Coaches and trainers
  • Interns
  • Systems
  • Programs
  • Testing and evaluations
  • Education
  • Profit centers
  • Facility management
  • Operations
  • Sales/marketing

Keep in mind that each one of these points is not just related to the private sector. It’s applicable to every single profession in the fitness and performance coaching industries. Even in the professional/collegiate sectors – if you truly research the most SUCCESSFUL coaches with significant history of job security – they have an incredible ability to MANAGE (including selling).

CHECK OUT THE FULL 10-PAGE ARTICLE INSIDE OF BPS UNIVERSITY


Lower Back Pain

Screenshot_2015-05-13_15.06.25

One of the most common ailments of people of all ages (athletes or the general
population) is low back pain. It is so common and causes so many issues that there
is an entire specialty (Chiropractic) that is dedicated to this condition. The reasons
is because of the severity of what could happen if low back pain continues without
treatment – pinched nerves, degenerative discs, arthritis, ruptured discs, etc.
Many of the most common treatments are – spinal adjustments, modalities,
increasing flexibility/mobility of the hips, strengthening, etc. Some of these can be
very expensive – in addition to the degree of uncertainty that may arise when trying
to choose a specialist that fits your situation.
In terms of treatment, some of the most basic and effective forms of correcting
dysfunction are ISOMETRIC STRENGTHENING. This goes well above and beyond
traditional strengthening of the trunk/spine (like crunches or planks). This can be a
very systematic approach to providing great stability across the various spinal levels
by ensuring that the muscles that attach to these levels are contracting properly.
In the pictures below, 4 key exercises will be demonstrated that strengthen the
muscles that are involved in the 4 key motions of the spine: FLEXION, EXTENSION,
LATERAL FLEXION, and ROTATION.
Usually low back pain and the onset of any type of condition in the trunk/spine
arises because the spine is inefficient at contracting muscles that are involved in one
or more of these motions. If one side is inefficient, the spine becomes unstable at
that level and many problems could arise. To combat this, it’s always a good idea to
train the motions from an isometric standpoint in every motion:

FLEXION

FLEXION

EXTENSION

Screenshot_2015-04-22_13.00.03

LATERAL FLEXION

LATERAL_FLEXION

ROTATION

ROTATION

Screenshot_2015-05-13_15.06.25

Sets/Time: Depending on the severity of your pain and your fitness level – can be
2-5 sets of 15 to 60 second holds
Advanced: There are dozens of variation of these isometrics – standing, kneeling,
split stance, squat stance, performing these band exercises while lifting, etc.
Also, different band tension and/or different force angles (how high or low your
partner/trainer puts the band) will dictate the emphasis being placed on various
muscles.
The great thing about these exercises is that they can be done with bands – which
are inexpensive and don’t take up space. And, they can be done from anywhere,
even at home. To be very specific about the cause of your low back pain – getting
evaluated by a specialist can dictate which variations of these exercises should
be assigned along with a progressive plan that can really aid in the reduction of
common low back ailments – with a plan for the future to keep from reoccurring.

Combating Knee Pain/Tendonitis

One of the most common areas of issues for adults is knee pain/tendonitits. The easiest way to combat these ailments – and build a program to supplement your current activity level – involves a 3-step process:
  1. STABIILTY. The most efficient way to ensure the knee is stable, and the structure of the joint is supported properly by the muscles that cross it, is to perform isometrics. Isometrics involves contracting a muscle at a specific range without moving; as opposed to moving the joint like traditional exercise. Looking at the muscles of the thigh the cross the knee joint (and/or are involved in function of the knee), there is the 4 primary groups:  muscles in the front (quads and hip flexors); in the back (hamstrings); on the inside (adductors); and outside (abductors). Progressions can begin at 3 seconds and progress up to 30 seconds for advanced adults.
    1. Advanced tipHaving a fitness professional assess any asymmetries (an imbalance) in the ranges of motion at the knee joint can help make the stability isometric program even more specific to your body.
  2. STRENGTH. Don’t be scared off by the term strength. This is not the typical term that people think of that means “how much weight can you lift.” This is simply just progressing the 4 main exercise listed above from isometrics to motion. Using the same 4 machines (or bands for advanced), a person can start to implement basic motions. The range of motion can start very small (just what a person can control), and start to increase as the knee becomes more stable through the isometrics. This style of progression can be specific to anyone.  We’ve had a lot of success with this protocol from anyone like an older person that just needs to combat various levels of knee pain to get back to the active lifestyle that they enjoy; to the 25-year old advanced fitness enthusiast that wants to get the knee stronger in order to train more aggressively. The key to finding what will work for your goals is to control two major factors: the range of motion and the speed (tempo) of the motion.
    1. Advanced tip:  If you are experienced with training, and already implement exercise such as squats and lunges – these exercise can still be for you – and lead to a lot more success (and less pain!) during the advanced training you are performing.  Just complex (superset) the single joint exercises listed above into your current routine.
  3. ENDURANCE. This is the key to long term health! Once the joint is stable, and you have provide the necessary strength at all of the required ranges of motion – ensure the knee joint can now handle your chosen activity. Doing exercises like backward and forward marches at various speeds and distances can greatly enhance all of the necessary muscles from an endurance component. Note the key word MARCH. Endurance training can be simplified for joint integrity and reducing pain; as opposed to the typical form of “endurance” that people think is cardiovascular. The marching can just focus on local muscular endurance, which is necessary for continued pain management.
    1. Advanced tip:  the use of resisted devices such as sleds, and pulley machines (outside) and the Keiser (inside) can make these exercises a lot more beneficial.

By: Pete Bommarito

UPPER BODY PRESSING STRENGTH – BUILDING ABSOLUTE, SPEED, REVERSAL, AND STABILIZATION STRENGTH COMPONENTS AND SPORT SPECIFICTY CONSIDERATIONS

By Pete Bommarito, MS, CSCS, USAW, MATCS, MAT Jumpstart

6-9-15

For years, the “Bench Press” has been the gold standard for athletes and fitness enthusiasts for total upper body strength.  In today’s era of Sports Performance, various strength components of all forms of upper body pressing remains a highly controversial subject.  There are some that feel that Bench Press strength (and strength endurance) it is still the gold standard for measurements of overall strength of the upper body.  There are some that feel that it is overrated, and prefer to train upper body pressing around what they consider to be more “functional” forms of upper body pressing.  Through all of the online controversy, one important truth remains to be constant – upper body pressing strength, in ALL its forms, is absolutely essential to all sports and levels of athletes.  This article will break down all forms of pressing strength; discuss the various components of how to maximize each form; and discuss all of the arguments in terms of level of importance and sport specificity.


POWERLIFTING “TRANSFER” and “SPORT-SPECIFICITY”

 The constant argument that maximizing absolute strength for the Bench Press should remain in Powerlifting and has little transfer to “Sport-Specificity” of many movements seen in athletic competition is completely ridiculous.  Even the argument that it should remain in heavy contact sports (such as Lineman in football) holds little to no value.  The bottom line is that many elite and well-educated Powerlifters have great knowledge on methods to improve overall Bench Press absolute strength – such as assistance exercises, techniques, variations specific to the body and individual weaknesses, periodization models, etc.  All of these great concepts relates to increasing efficiency, safety, and performance improvements of all forms of upper body pressing.  Yes, they will use is specifically for their event in their sport.  However, that doesn’t diminish the value of the concept of the necessity of upper body pressing strength and efficiency with all levels of athletes at all sports.  When identifying this “importance”, just break down the biomechanics of what is actually occurring during an “upper body press”, whether it be a traditional Bench Press exercise or not.


“What is an upper body press?”

  • GlenoHumeral (GH) Horizontal Adduction 
  • Elbow Extension
  • Scapular and Spinal stabilization


There will be varying degrees of these biomechanical motions.  For example, the amount of GH horizontal adduction between a DB press and a barbell press; or incline versus flat.  Or the increased level of scapular/spinal stabilization needed for a good “arch” in the lumbar/thoracic area via a commonly used Powerlifting technique.  Or the level of stabilization isometric strength required for a SA DB Press, specifically through the trunk/spine rotators.  However, the most important factor is that no matter the variation, the three aforementioned motions will always occur.


“Sport-Specificity? 

In the weight room, the most overrated topic in the entire industry of Sports-Performance.  Never has this “arguement” been more ridiculous than something like than upper body pressing.  Think of these main questions, when questioning whether upper body pressing is “necessary” for your sport:

  • Is there any sport where GH Horizontal Adduction does NOT occur?
  • Is there any sport where elbow extension does not occur?
  • Is there any motion in the weight room that exactly mimics the specificity of the actual motion that occurs in sport
  • THE ANSWER TO BOTH QUESTIONS IS A RESOUNDING NO!

The bottom line is Sports Performance Coaches need to stop trying to mimic what is “specific” to the motion of what exactly is occurring in their sports and start thinking in terms of what biomechanical motions occur during their sport.  Hence, what is known as the BPS mantra:  TRAIN MUSCLES, DO NOT TRY TO RECREATE MOTIONS OF THE SPORT!!


Training the muscles themselves that produce a motion – in all of the forms of strength – in BOTH isolated and complex mutil-joint movements WILL transfer to the sport.  And it will transfer to the motions of the sport.  Muscles create the motions seen in sport.  There are many ways to train and develop these muscles that will enhance these motions seen in sport – without actually recreating the motion!  Hence upper body pressing, which may not recreate ANY motion exactly seen in sport, but greatly enhances strength and efficiency of key motions seen in virtually EVERY sport!

  • Do “throwing” or “overhead” athletes undergo GH Horizontal Adduction and/or Elbow extension during their sport? YES
  • Do “fighters” or “combat” athletes really need to ALWAYS train the “endurance” aspects of upper pressing, or try to make the press specific to a “punch” with bands, cables, air resistance?  NO
    • Is this move into more specificity important? YES, but at later forms of the training cycle
    • Will just simply strengthening and increasing the efficiency of GENERAL FORMS of GH Horizontal Adduction and Elbow Extension lead to greater trainability at the more “specific” forms of training, like more punching motions with bands, cables, with/without strength endurance?  YES
    • Will absolute strengthening of general pressing lead to more efficiency when building eccentric, reversal, and dynamic pressing motions?  YES
    • Is pressing strength, even in general and basic forms “specific” to all athletes at all levels in all sports?  YES!


Just always remember when discussing anything “functional” or “sport-specific” to as the RIGHT QUESTIONS.  And give answers based on proven biomechanics of how the body functions – in training versus sport specific motion.


Keep in mind that general modications can be made for the individual, NOT the sport.  The individualization might arise because of the wear and tear of the sport.  But the variations of pressing strength is always related back to the individual.  The specificity of the sport always relates back to volume.  Not just volume of the overall periodization model, but volume of each of the types of strength seen in the overall periodization model.  For example:  An Offensive Lineman in the NFL will differ from a high school volleyball player with regards to volume.  They both need pressing strength with regards to absolute, speed, reversal, and stabilization strength.  But the overall volume of pressing strength on each workout of the overall periodization model will be different.  And the volume of each of the categories of absolute, speed, reversal, and stabilization strength will be different.  Any modifications (board versus flat, overhand grip versus neutral grip, DB versus barbell) will be related to the individual – NOT the sport.  Individuality is that of injury history, current ability to neurologically contract, ROM limitations (biomechanical or current neurological function), training history, etc.


ABSOLUTE STRENGTH

Absolute pressing strength usually revolves around a 1RM (rep maximum) Bench Press.  The most “sport-specific” form obviously being Powerlifting, since the Bench Press IS the sport (or one of 3 key events in the sport).  As more and more eilte Powerlifters and Powerlifting coaches enter the world of Sports Performance, maximizing Bench Press absolute strength for athletes is becoming more and more prominent.  As demonstrated above, the elite Powerlifting community can be extremely valuable in terms of all forms of upper pressing absolute strength.  In fact, 1/3 of their entire sport revolves around the ability to maximize upper body strength while limiting overload joint stress associated with this motion. All assistance exercises and variations will then lead towards efficiency and minimizing overload stress.  Imagine how important it is for an “overhead” athlete to train GH Horizontal Adduction and Elbow Extension without overload stress on the associated joints!  Can even baseball players learn a great deal from an intelligent Powerlifter that has perfected the art of maximal strength?  Absolutely


One more thing to keep in mind with regards to “specificity” of absolute strength training of upper body pressing is CNS overload.  Overall neural recruitment is essential to maximizing all forms of athleticism.  Upper body pressing strength, even with and especially with limiting range of motion pressing (board/floor press), will definitely require high motor unit recruitment.


In terms of maximizing absolute strength, be careful of not trying to follow rules.  However general guidelines are very important.  Following these simple guidelines can be a great starting point for all athletes, with obvious individualization needed with regards to independent variables listed above (like injury history, etc.).:

  1. Use 4-board, 3-board, 2-board, and 1-board pressing extensively.  Not onl for great variation at a found weakness (“sticking point”), but also for training in ranges they can control.  Many times, even the strongest and most experienced lifters can have a neurological inhibition which can limit range of motion control.  Identifiy the inhibiton and treat it to open up the range, but don’t slow down the absolute strengthening progress – just train in the controllable range of motion at that particular snapshot in time
  2. Use variable load consistently!  Accommodating resistance is well documented and scientifically proven.  Don’t only use it for Dynamic days, it can be a valuable CNS overload on maximum-effort days as well
  3. The less experienced lifters use less variations.  The more experience lifters use more variations.   For our more experienced lifters, we change the variation of the pressing almost weekly.  For less experienced lifters, use the same press for at least a 3-week microcycle to gain experience in the actual skill of the assigned press.  Don’t change the variation just for the sake of changing it.  Always have a reason.
    1. For our middle school and grade school athletes, we change it about every 8 weeks
    2. For our high school and beginning collegiate athletes, we change about every 3 weeks.
    3. For our elite and professional athletes, we change it weekly; unless they are a less experienced lifter, or an injury gets them back into the category of needing to master a pressing exercise skill
    4. Double up on the volume of upper pulls and assisted exercises of elbow extensors.  Overload the volume of all of the pulls – GH extensors, scapular retractors and depressors, GH horizontal abductors, elbow flexors.  Comlex and isolated movements! Having a strong “base” is extremely important to the art of maximal pressing.  Sheer elbow extensor strength and strength endurance is crucial to the art of the press – with a barbell or DB (even though its more prominent with a barbell)
    5. Use more DB with overhead athletes; but not with younger high school and pre-high school athletes.  Not because its more “specific”.  But because more horizontal adduction is required and that is a crucial biomechanical action that needs more volume.
    6. Use a Neutral Grip bar with athletes with neurological inhibitions of GH internal rotation.  The obvious reason is that it limits the amount of GH internal rotation with the pressing motion.
    7. Use a good volume of true max effort work (90% and above) in a given 3-week microcycle – even with high school athletes.  And don’t be afraid of max effort work with DB and SA DB – same concept
    8. Use Floor Pressing as a standard in every phase macrocycle (example summer 8-week macrocycle before training camp.  It’s a phenomenal tool to maintain the proper intention of the exercise of pressing


DYNAMIC STRENGTH / REVERSAL STRENGTH

Dynamic Strength is just like it sounds – pressing a specific load as fast as possible through a range of motion as opposed to the overall amount of load that can be pressed through the range of motion.  This type of strength is extremely important to sport.  Absolute strength sets the base, enhances the contractile capability of the motion, and improves quality of the contraction.  The dynamic motion is a shift to more true “specificity”.  In discussing real specificity, think in terms of the contraction, not just the motion.  Dynamic contractions are specific to sport because sport is dynamic.


Reversal strength is using the stored elastic energy off of an eccentric contraction to a stretch reflex that contributes to a more powerful concentric contraction during the press.  Dynamic strength and Reversal Strength are thus completely related.  Each will have a more positive effect on the other.  Also keep in mind that an “X” isometric (no pause – a quick eccentric-concentric action) is not always required to build reversal strength.  It takes an extremely experienced lifter, and a ton of absolute eccentric strengthening over time to safely and efficiently hit an XXX tempo on an upper press.  The potentiation factor of a fast eccentric (1 or X on the eccentric) will raise the threshold.  Even if the stretch reflex isn’t used during a loaded press, doesn’t mean that the reversal strength isn’t being trained.  Muscle contraction is all about the threshold.


Guidelines for Dynamic Strength:

  1. Build and micro-progress the tempo over time of a training cycle.  Using a tempo structure of ECCENTRIC-ISOMETRIC-CONCENTRIC, and with “X” noting “as explosive as possible”.  Work your way into an XXX tempo, if at all.  Many of our elite, most experienced lifters never progress beyond a 11X or X1X in a macrocycle
    1. 21X
    2. 11X
    3. X1X
    4. XXX
    5. Build as much eccentric and isometric strength as possible.  Raising the threshold of stored elastic energy off of an eccentric is crucial to the stretch reflex action.
    6. Contract hard during the isometric holds.  The intention of the exercise at various phases of the range of motion is just as important as the exercise selection
    7. Don’t be afraid to change the intension with external forces!  The faster the contraction, the more difficult it is to control the actual intention of the press.  Using bands, slingshots, and manual resistance on above or below the elbow joint to create a variation of intention of “out” or “in” at various phases is a great development tool for dynamic work
    8. Always use variable loading.  Simple concept of accelerating through the end range of motion of the press can be safely and efficiently executed with accommodating resistance.
      1. Simple progressions of chains to multiple chains to bands
      2. Use all forms of bands and progress based on tention:  mini, micro-mini, micro, light, etc.
      3. Use Speed-Strength (1.0+ m/s)  and Strength-Speed components (0.7 to 1.0 m/s).  They are both necessary components of dynamic and reversal strength
      4. Use an analytical component (Tendo is the easiest to use and most efficient).  Best tool for the money,and absolutely essential to specific progressions
      5. Set a good base of absolute strength and learning of the art of the press as a preclude into pressing.  However, don’t follow guidelines of “how much” pressing absolute is necessary for dynamic and reversal work.  Other than Powerlifting, this doesn’t really apply.  Don’t rush inexperienced, weaker lifters into dynamic with variable loading before they have at least mastered the art of the press.  However, DON’T wait until they can “bench a certain amount.”  Some athletes can do speed work without even getting a ton of maximal work.  Speed strength is an essential form.  If someones maximal capability happends to be less than another, doesn’t necessarily mean he/she should not do dynamic work.  Set the base, but incorporate lighter, variable loaded dynamic work as soon as the art is perfected.


STABILIZING STRENGTH

Stabilizing strength should never be confused with what a lot of people are labeling as “functional strength.”  Remember that unilateral work, DB work, standing cable/band presses, using unstable surfaces does not make things more “functional.”  Training “function” of a sport or movement mean to incrase the capabilitiy of the motion.  If there is an inhibition and/or weakness of a specific muscle involved in a motion, simply activating and/or strengthening that muscle via isometrics and isolation exercises is the most “functional” thing you can do.  Because that system will lead to the greatest function.


However, keep in mind that stabilizing strength is important.  For this purpose, stabilizing strength has a lot of independent variables and forces involved of the smaller muscles that cross and stabilize a joint involved in the motion.  Great examples for upper pressing is the muscles that are involved in protracting the scapula and upper rotating the scapula.  Protraction of the scapula will definitely occur during an upper press.  And, depending on the position of the GH joint during the press, upper rotation of the scapula will occur.  Isolating these type of muscles is crucial to the stabilization factor of a pressing motion


Guidelines for stabilizing strength:

  • Use a variety of exercises to accomplish many forces around movement of the scapula
    • Flys
    • Punches
    • Scapular pushups
    • Scapular punches
    • Scapular raises
    • Perform higher tempos and a lot of time under tension.  Gain as much cross-bridging as possible to elicit a response of the smaller tissue of these involved muscles
    • Work great as a beginning preparation before heavy multi-joint pressing and as a complex to keep the actively stimulating this tissue

Upper Body Strength-based Preparation

UPPER BODY STRENGTH BASED PREPARATION/WARMUPS

Pete Bommarito, MS, CSCS, USAW, MATS, MAT JS


For any upper-body strengthening program to truly be efficient, there must be proper joint preparation.  This is beyond just a standard “warm-up”.  This is really focusing on preparing the joints for the motions that will be encompassed within the session.  It’s also important to remember this type of preparation of the joints is a training system over time – not just to prepare for the succeeding workout.  As with any warm-up / preparation, the stimulus can be overloaded over time, as the various systems of strength are increased and overloaded throughout the overall program.


The obvious basics of strengthening always centers on these main aspects – absolute strength, speed strength, dynamic eccentric loading, and reversal strength.  No matter what the “theme of the day” is – one (or more) of these main four aspects are centered within two primary upper body motions – pressing strength, and pulling strength.  To properly prepare joints for all aspects of strength with pressing and pulling motions, an understanding of all of the main joints and main joint motions for the upper body is essential:

  • Shoulder flexion (to humerus parallel to ground)
  • Shoulder flexion continued overhead
  • Shoulder abduction
  • Shoulder adduction
  • Shoulder extension
  • Scapular protraction
  • Scapular retraction
  • Scapular elevation
  • Scapular depression
  • Humeral rotation

There are many variations and subdivisions of each of these motions (such as shoulder horizontal abduction/adduction, elbow flexion/extension), but for simplicity purposes, the focus will be on these aforementioned motions.


No matter what form of the four main aspects of strength for either pressing motions or pulling motions encompassed within with exercises for the workout, a combination of each of these joint motions will be utilized.  Hence, it is always good practice to encompass these motions with slow controlled tempos and isometrics at various ranges to properly warm-up and prepare for the workout.  The following exercises use one or more of the motions described above.  These exercises can be referenced in the Exercise Database section of the online University (Strength, Upper Body, Auxillary).  Again, it is necessary to understand the following exercises can be overloaded over time – by increasing the load (or weight), increasing the tempo, and/or increasing the isometric hold at various angles.


Shoulder V-Raise (thumbs up) / Rotate

–       Shoulder flexion (to humerus parallel to ground)

–       Humeral internal/external rotation at a shoulder flexed position

–       Isometric strengthening at a shoulder flexed position with isometric scapular retraction at this flexed position

–       Shoulder extension


Shoulder T-Raise (palms down) / Shrug

–       Shoulder abduction

–       Scapular elevation

–       Scapular depression

–       Isometric strengthening in shoulder abducted position with isometric scapular retraction at this abducted position

–       Shoulder adduction


Shoulder V-Y Raise (thumbs up)

–       Shoulder flexion (to humerus parallel to ground)

–       Continued shoulder flexion overhead 

–       Shoulder extension 

–       Isometric strengthening in shoulder flexed position with isometric scapular retraction at this flexed position

–       Shoulder extension


Shoulder T-Raise / Rotate

–       Shoulder external rotation

–       Shoulder abduction in externally rotated position 

–       Shoulder internal rotation in abducted position 

–       Shoulder external rotation in abducted position 

–       Isometric strengthening in shoulder abducted position with isometric scapular retraction at this abducted position 

–       Shoulder adduction in externally rotated position 


Scapular Pushups (hands)

–       Scapular retraction

–       Scapular protraction


Scapular Pushups (elbows)

–       Scapular retraction

–       Scapular protraction

–       Note that this scapular retraction and protraction is with the intention of pressing isometrically into shoulder horizontal abduction.  Because the entire forearm is on the ground, it’s easy to perform a good isometric contraction into horizontal abduction (pushing out) while the concentric/eccentric action of scapular retraction/protraction is occurring.  This is the main difference between the Scapular pushups from the hands or elbows – the elbows allows for this unique intention, which changes the exercise completely.


As stated earlier, there are many different exercises and variations of exercises that can accomplish the goals of:  preparing for the immediate workout; and develop an increased tolerance to loads of future workouts.  This 6-exercise systems definitely is a great place to start because it encompasses isometric, concentric, and/or eccentric strengthening / preparation of all motions of the shoulder and scapular required during any variation of exercises for pressing strength and pulling strength.  Examples:

–       Standard bench/board/floor press exercise – there is isometric contraction of the scapular retractors, with concentric shoulder horizontal abduction and elbow extension; with slight scapular protraction at the end of the press.

–       Standard rowing exercise – there is scapular retraction, with concentric shoulder extension (and possibly shoulder horizontal abduction, depending on the row variation) with elbow flexion; and isometric contraction of the scapular retractors during the eccentric action of the row with scapular protraction at the end of this eccentric

–       DB pressing/rowing  depending on the variation of the use of the DB press or row, there can be humeral internal/external rotation involved.


This provides a great basic summary of the actual joints (and joint motions) involved in the primary exercises during a typical upper body workout.  An efficient way to prepare for increased loads of pressing and pulling for the workout would be to “warm-up” with these joint motions with low loads, slow tempos, and isometric contractions at key points in the ranges of motion.

The Back Box Squat

By: Adam Boily, MS, USAW, MAT Jumpstart, BPS Level 1

The Back Squat
At Bommarito Performance Systems (BPS), the squat is one of our most
utilized exercises.  It recruits almost every muscle in the body and may be the “best”
lower body exercise.  There are many variations of the squat exercise depending on
the intention and goal of the athlete.   For example, BPS commonly prescribes a box
squat by using a standard Olympic lifting bar, cambered bar, safety squat bar and/or
a belt squat.  Traditionally and most frequently at BPS, the Olympic lifting bar is
used when an athlete does a squatting exercise.  The cambered bar is a good
alternative for throwing athletes because this bar may be used with less shoulder
extension/external rotation.  Thus, reducing the stress placed on throwing athletes’
shoulders during offseason training.  Furthermore, this same concept may be
applied to the advantages of using a safety squat bar.  Perhaps an athlete has a trunk
and spine issue and placing an external load on athletes’ shoulders is not desirable.
In this scenario, the belt squat may be the best option.  Typically, the intention or
GOTE (Goal Of The Exercise) of the squat exercise, no matter the variation, is to
increase lower body hypertophy, strength, and/or concentric power (and in some
cases – high speed eccentric loading).

BPS frequently utilizes the placement of a box behind the athlete when
performing the back squat (no box need for a front squat).  This box serves many
purposes such as providing a gauge for when the athlete should cease the eccentric
portion of the lift and either begin the concentric portion or execute an isometric
hold before initiating the concentric action.  The height of the box can be modified to
each athlete according to his or her height.  The height of the squat can sometimes
be determined by the off-season phase.  For example, sometimes we do very low box
squats, of the “Olympic Style”; especially when we’re trying to emphasize the knee
extensors more.  Other times it’s appropriate to execute “high box” squats – using
supra-maximal loading for changes in neural development.  In terms of just
analyzing what is appropriate for an athlete if you want to execute a typical box
squat just below parallel, it can be identified during a simplistic AROM (Active
Range of Motion Exam).  This is the point at which full control over the joints can be
maintained throughout the squatting range of motion (especially around the lumbo-
pelvic joints).

Most BPS exercises are accompanied by a tempo, which a coach may employ
to determine the time under tension for any exercise.  This tempo tells the athlete
the duration of the eccentric, isometric, and concentric portions of the exercise.  It is
important for a coach to control the tempo based on the GOTE.  For example, an
athlete performing the speed squat (traditionally used with variable resistance i.e.
bands or chains) with novice experience may have a 21X tempo (eccentric 2,
isometric 1, and concentric X or fast).  If the athlete is considered to have advanced
level experience and has followed a proper periodization, it would be beneficial to
employ an X1X tempo for the speed squat.  The isometric (1 second hold) is
executed when the athlete has his or her gluteus Maximus barely touching the box
placed behind the athlete.  The isometric phase of the speed squat is a crucial
training effect for minimizing the stretch reflex that occurs throughout sport such as
jumping or sprinting.

Another advantage of using an isometric pause on the box during the box
squat is it allows the lifter time to consciously drive or push his or her knees
laterally to avoid a harmful valgus moment, which is commonly experienced during
the squat exercise.  It is at this moment that the knee joint can become
compromised, as it is not in a stable closed-packed position.  The coach should offer
a coaching cue to the athlete with the intention of avoiding valgus knee moment.
The box allows the athlete to easily identify where he or she must isometrically
pause and wait for a loud “hit” command from the coach, which triggers the athlete’s
fight or flight response and helps to increase the athlete’s concentric power (the
GOTE).  In conclusion, it is this concentric power that can be enhanced with the
proper utilization of the box squat accompanied with the appropriate tempo.

Many examples of tempos:

311

212

21X

11X

X1X (usually done with low intensity, but very high variable loading)

Screenshot_2015-05-13_14.53.05

MAKING YOUR PREPARATION SPECIFIC

PETE BOMMARITO MS, CSCS, USAW, MATCS

When planning out a preparation for the movement/speed/conditioning session for the day, it’s always a good idea to include a good amount of exercises that is as specific to the patterns that will actually be performed.  In the Preparation section of Bommarito University, there are 4 primary sections for Preparation to be performed at the beginning of all sessions.  And the overall Preparation can be best described as CNS Activation and Muscle/Joint Preparation Systems (CAMPS):

  • Support System Preparation – primarily the “impact” joints of the toes, feet, and ankle
  • Trunk/Spine Preparation
  • Suspension / Support / Trunk (SST) Systems Preparation – focusing on the “link” between the Support and Trunk/Spine which is the suspension system through the hips, knees, and pelvis
  • Unloaded Speed/Movement Preparation

When focusing specifically on the SST Systems Preparation, notice there is an extremely large volume of exercise choices in the database for all 4 sections.  The 4 sections of the SST are:

  • General movement/muscle prep and tissue temperature elevation
  • Local joint isolation
  • Joint mobility/stability
  • CNS activation

The exercises listed on Bommarito University in the CAMPS section are just a sample of thousands of exercises that can be used for preparation.  There are over 150 individual sample exercises just in the SST section alone.  For an athlete to perform every single one of these exercises before a session would take well over an hour.  It’s a given that an hour-plus of preparation is definitely not needed for a session.  The big key question becomes how to choose which exercises on which days.  Some of it needs to be individualized to the client and the specific medical and/or biomechanical needs.  But some exercise selection can also match the specificity of the day.  Some basic examples are outlined below for each of the main movement categories.

LINEAR ACCELERATION

The main focus for acceleration should be the full Support System Prep; and the SST System Prep that focuses on hip flexors, hip extensors, and hip separation.  An example of exercises out of the Bommarito Database for SST:

Section 1 – General Prep

  • HIP FLEXION / KNEE EXTENSION / HIP SEPARATION EMPHASIS
    • Activation Prep – Buttkick Raise; Walking Knee Hug Lunge
      • Activation – Walking Lunge; Walking Extended Lunge – pause
      • DECELERATION EMPHASIS
        • Activation Prep – Rhythm March – SLOW PAUSE
          • Activation – Explosive Rhythm Lunges

Section 2 – Local Joint Isolation

  • HIP EXTENSION EMPHASIS
    • Kneeling/Prone Hip Isolation Series
      • Kneeling Hip Extension – PAUSE and REFLEX
      • Prone Hip Extension – PAUSE and REFLEX
      • HIP FLEXION / KNEE EXTENSION EMPHASIS
        • Supine Hip/Knee Series
          • Straight (opp leg bent) – PAUSE and REFLEX
          • Bent Straight (opp leg bent) – PAUSE and REFLEX
          • Bent Medial (opp leg bent) – PAUSE and REFLEX

Section 3 – Joint Mobility/Stability

  • HIP/TRUNK MOBILITY/STABILITY EMPHASIS
    • Kneeling/Prone Hip Mobility Series
      • Kneeling hip extension/out – PAUSE and REFLEX
      • Kneeling hip extension/rotate/out – REFLEX
      • Prone extension/out – PAUSE
      • HIP SEPARATION EMPHASIS
        • Pushup Hip Series
          • Knee Drives
          • Knee Drive Switches

Section 4

  • RE-DIRECT FORCE EMPHASIS
    • Back Reach Run – half speed, ¾ speed, full speed
    • CNS ACTIVATION EMPHASIS
      • Linear Wall drills – singles, triples, rapid fire sprint (from Linear Acceleration script)

ABSOLUTE SPEED

Absolute speed, or maximum velocity, is obviously very similar to acceleration in the sense that it is movement in a straight line.  However, because it is moving at much greater speeds, and the leg is moving in more of a cyclical pattern (as opposed to the piston action of acceleration), the body must be prepared for these varying forces.

The Support System Prep through the foot/ankle joints will be similar, but just in lower volumes as compared to acceleration.  Instead of performing the entire sequence, probably just choosing two or three exercise sequences from this system is probably adequate.  Instead, the focus can be transferred more to the Trunk/Spine Preparation, which can make the absolute speed session much more efficient.

Trunk/Spine Preparation:

  • Alignment Position Band stabilization holds (from the right and left side) – since the athlete is set into a kneeling position with the hips separated, the force of the band coming from the right and the left side will emphasize the lateral flexors of the spine from an isometric standpoint while the pelvis is being stabilized in this split position
  • Forward Single Arm Sled March – the “heel dig and pull” action of the sled march will concentrically work the hip extensors.  While the force of the attachment of the sled is coming off of one side of the body (hence, the single arm position), the emphasis is being places on the rotators of the spine from an isometric standpoint as the hip is extending concentrically

SST Systems Preparation:

Section 1 – same as acceleration

Section 2 – same as acceleration

Section 3 – same as acceleration

Section 4 – now shift to more focus on absolute speed preparation

  • CNS ACTIVATION and HEAVY ECCENTRIC LOADS EMPHASIS
    • Ankling – half speed, ¾ speed, full speed
    • SL Stiff Leg Deadlift – PAUSE and REFLEX
    • Ankling to Buttkick – varying distances
    • Straight Leg March – SLOW PAUSE and FAST REFLEX
    • Straight Leg Skip – individual and continuous

LATERAL / FORWARD MULTIDIRECTIONAL

A movement day involving patterns of lateral shuffle, lateral runs, and/or any forward multidirectional day will place a great deal of emphasis on heavy forces across the foot/ankle joints for changes of direction, and using a lot of hip adductors and abductors in various multidirectional runs and motions.

For the absorption of force and re-direction of forces for changes of direction, the entire Support System Preparation would be appropriate.  For the choices of exercises for SST System Preparation, the emphasis could be as follows:

Section 1 – General Preparation

  • HIP EXTERNAL ROTATION EMPHASIS
    • Activation Prep
      • Hip Rotate (Glute) March – SLOW PAUSE and REFLEX
  • Activation
    • Hip Rotate (Glute) Skip – Rhythm individual and Power
  • Active Motion
    • Hip Rotate (Glute) Raise
    • HIP ADDUCTION EMPHASIS
      • Activation
        • Adduction Rhythm – varying speeds
  • Active Motion
    • Lateral Lunge – ROLL FOOT
    • Explosive Lateral Lunge – ROLL FOOT
    • HIP SEPARATION / ECCENTRIC LOADING EMPHASIS
      • Activation
        • Sumo Squat
  • Active Motion
    • Sumo Squat-outs

Section 2 – Local Joint Isolation

  • HIP ABDUCTION EMPHASIS
    • Side Lying Hip Series
      • Side Raise – PAUSE and REFLEX
      • HIP ADDUCTION EMPHASIS
        • Side Lying Hip Series
          • 30-deg Adductor Raise – PAUSE and REFLEX
          • 60-deg Adductor Raise – PAUSE and REFLEX
          • HIP FLEXION/HIP ROTATION EMPHASIS
            • Supine Hip/Knee Series
              • Lateral – rotate out (opp leg bent) – PAUSE and REFLEX
              • Medial – rotate in (opp leg bent) – PAUSE and REFLEX

Section 3 – Joint Mobility/Stability

  • TRUNK MOBILITY EMPHASIS
    • Standing Trunk Series
      • Trunk/Hip Rotations – SLOW and FAST
      • HIP/KNEE/ANKLE STABILITY
        • Standing Hip Series
          • SL Isometric ¼ Squat – front extension – slow
          • SL Isometric ¼ Squat – side extension – slow
          • SL Isometric ¼ Squat – side extension – slow

Section 4 – CNS Activation

  • DYNAMIC HIP MOBILITY EMPHASIS
    • Leg Swing Series
      • Linear – PAUSE and REFLEX
      • Lateral – PAUSE and REFLEX
      • CNS ACTIVATION EMPHASIS
        • Lateral Wall Drills – doubles (from Lateral Movement script)
        • Lateral Line Bounding – singles (from Lateral Plyometric script)

BACKWARD MULTIDIRECTIONAL

For a backward multidirectional emphasis, whether it is a backward run or a backpedal/anglepedal weave motion, will be really focusing on hip pivots.  Analyzing hip pivots from a biomechanical standpoint, it’s obvious that a lot of hip horizontal adduction and hip horizontal abduction occurs.   The preparation systems can then be emphasized with these two primary motions.  Just like with lateral and forward multidirectional, changes of direction will place a heavy emphasis on the Support System Preparation (for the foot/ankle joints).  However, one main difference is when executing the Support System Prep for backward emphasis days, the main focus should be on two exercise sequences from this database – Back Dorsiflex Series and Back Low Walk Series.  Instead of performing the entire Support System Preparation on the backward days, it might be more appropriate to just focus on multiple reps of just the Back Dorsiflex and Back Low Walk series.

For the SST Systems Prep, the following sequences have proven to be very appropriate for backward emphasis days:

Section 1 – General Preparation

  • HIP HORIZONTAL ABDUCTION EMPHASIS
    • Activation Prep
      • Back Pivot March – SLOW PAUSE and FAST REFLEX
  • Activation
    • Back Pivot Skip – rhythm individual, rhythm continuous, power
  • Active Motion
    • Drop Lunge, Explosive Drop Lunge, Explosive Drop Lunge-pause
    • HIP ADDUCTION EMPHASIS
      • Activation
        • Adduction Rhythm – varying speeds
  • Active Motion
    • In Place Lateral Lunge – FEET INVERTED
    • Lateral Shifts – FEET INVERTED

Section 2 – Local Joint Isolation

  • HIP HORIZONTAL ABDUCTION EMPHASIS
    • Kneeling/Prone Hip Isolation Series
      • Kneeling Side Lift – PAUSE and REFLEX
      • HIP ABDUCTION EMPHASIS
        • Side Lying Hip Series
          • Side Glute Raise – PAUSE and REFLEX
          • HIP ADDUCTION EMPHASIS
            • Side Lying Hip Series
              • Adductor Raise – PAUSE and REFLEX

Section 3 – Joint Mobility/Stability

  • TRUNK MOBILITY/STABILITY EMPHASIS
    • Lying Trunk Series
      • Supine Crossovers – PAUSE and REFLEX
      • Prone Crossovers – PAUSE and REFLEX
  • Kneeling Trunk Series
    • Alignment Thoracic Rotation – PAUSE and REFLEX
    • HIP/KNEE/ANKLE STABILITY
      • Standing Hip Series
        • SL Squat Touchdown – PAUSE and REFLEX

Section 4 – CNS Activation

  • DYNAMIC HIP MOBILITY EMPHASIS
    • Leg Swing Series
      • Forward/Backward Circles – SLOW and FAST
      • CNS ACTIVATION / EXTREME FORCE ABSORPTION/RE-DIRECTION EMPHASIS
        • Back Lunge Series (from Backpedal/Anglepedal script)
          • All 6 levels

As with any preparation for any movement script, the Unloaded Speed/Movement Prep can be a good substitution and change of pace.  However, for the concept of specificity, the exact scripts listed above can really be an efficient way to progress the forces required for the exact movements seen in the training.  Many example and variations of exercises can be substituted, but the main concepts can always be implemented for optimum performance.  To summarize:

LINEAR ACCELRATION

  • Full Support System Prep
  • SST Systems emphasis on hip flexors/extensors
    • CNS Activation emphasis on re-directing force

ABSOLUTE SPEED

  • Short, quick Support System Prep
  • Heavy emphasis on Trunk/Spine Prep
  • SST Systems emphasis on hip flexors/extensors
    • CNS Activation emphasis on technical mechanics of absolute speed and heavy emphasis on eccentric loading

LATERAL/FORWARD MULTI-DIRECTIONAL

  • Full Support System Prep
  • SST Systems emphasis on hip abductors/adductors and trunk stability
    • CNS Activation emphasis on dynamic hip mobility and low-grade plyometrics of absorbing forces through the edges of the feet

BACKWARD MULTI-DIRECTIONAL

  • Support System Prep heavy emphasis on forces in a backward pattern (Back Dorsiflex and Back Low Walk Series)
  • SST Systems emphasis on hip horizontal adductors and hip horizontal abductors and trunk mobility
    • CNS Activation emphasis on dynamic hip mobility and force absorption and re-direction in low, deep-bending positions

Screenshot_2015-06-23_19.53.47