(TRAINING CAMP PREPARATION PHASE)
Pete Bommarito, MS, CSCS, USAW, MATCS, MAT Jumpstart
Typically for football players, the off-season is set around 4 primary phases/macrocycles:
- General Preparatory / Re-Alignment / Regeneration – immediately after the season that focuses on low volume and full recovery from the season
- Intensification – Preparation for spring activities centered around on-the-field football work
- Spring ball, OTA’s, and/or Mini-camps – low volume of maintenance work as the focus shifts to football
- Training Camp / Season Preparation – secondary intensification that increases volume again, gets into more sport-specificity, and peaking of maximum power
This article and accompanying Training Script (available on Bommarito University: http://www.bommaritoperformance.com/workshops/bps-university/) will be centered on the 4th primary macrocycle of the off-season. It’s understood that the spring football activities will affect each player individually, so there will be varying levels and time commitments that focuses around the regeneration part. Typically, this regeneration focus is much less than right after the season, as the ground base of work and the foundation for joint integrity has already been set in the first two macrocycles, and maintained as much as possible during the third macrocycle. Once the athletes are ready to get back into intensified work, this plan has proven to be extremely effective.
A full breakdown of the volume and type of work done each day of the week needs to be understood:
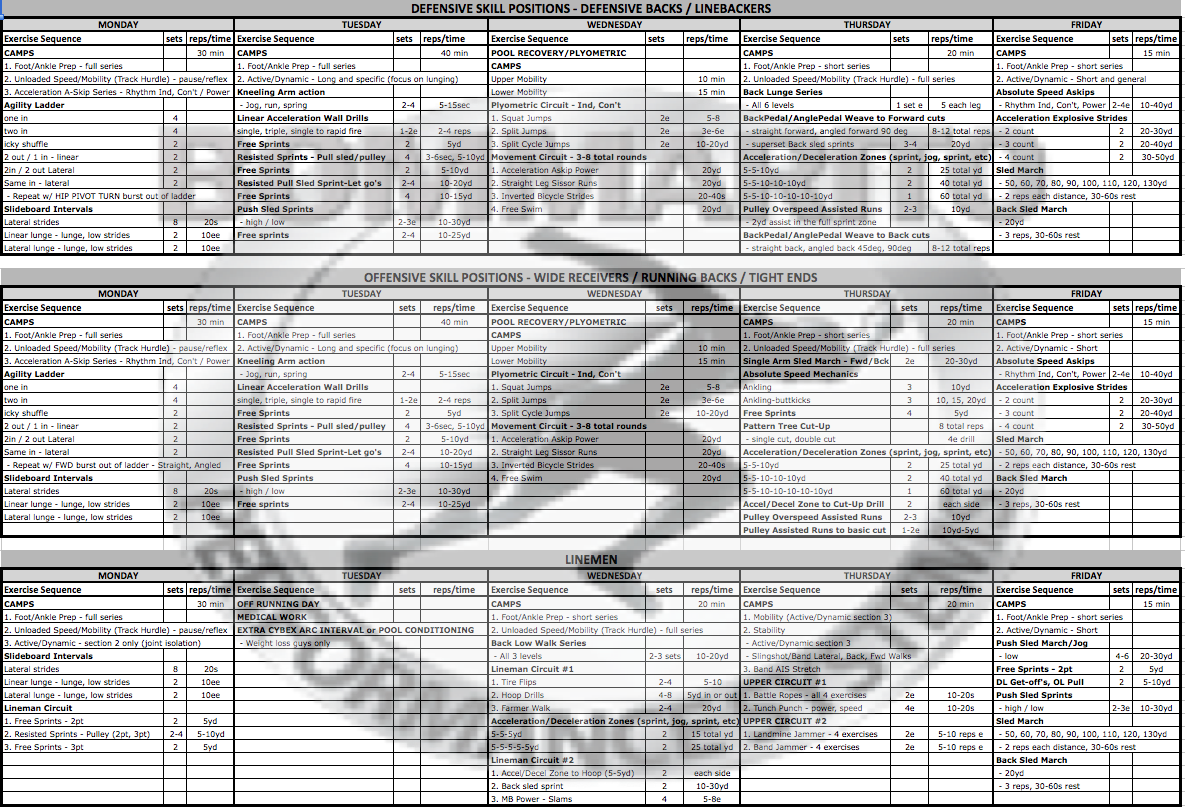
MONDAY – CNS ACTIVATION AND PREPARATION DAY
- High Neural loads
- Low Joint loads
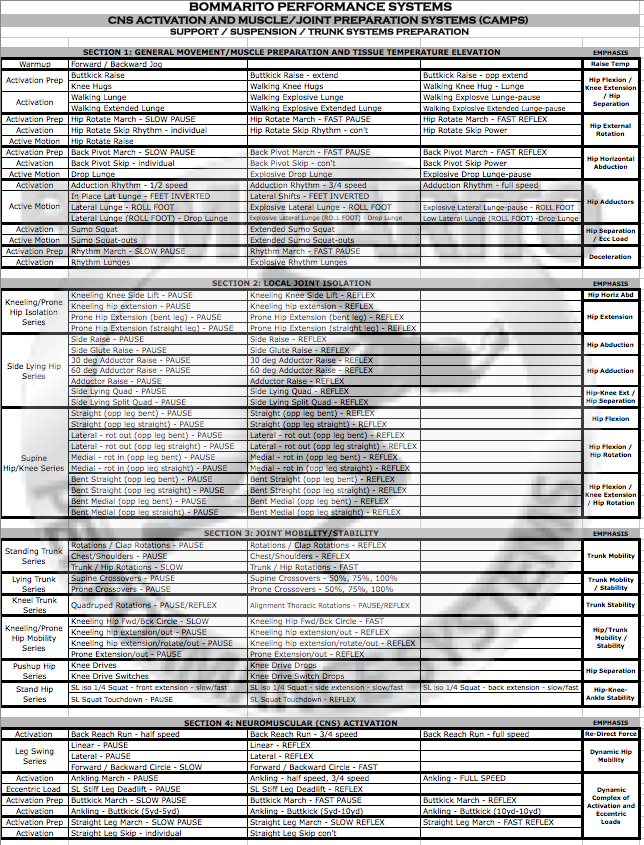
- CAMPS (CNS Activation and Muscle/Joint Preparation Systems)
- Absorption Force, Accepting body weight, Re-directing force – high volume/intensity
- Unloaded Speed – low volume/intensity
- Overall Training Volume – medium to low
Because of the 2 days on the weekend of rest and recovery, getting the nervous system back into a heightened state is necessary to have an efficient training effect for the rest of the week. Note that there is a heavy emphasis on footwork. Footwork is about as non-sport-specific as it gets, because the body is not really moving at speeds seen in sport, hence the low joint loads. If a full-speed sprint is performed, the body can be moving at 20+ MPH, which puts a tremendous load on all of the joints in the body upon ground contact. Which is a great training effect, but not as appropriate when the CNS is in more of a suppressed state because of the 2-day recovery weekend. Remember when executing a full speed sprint, the leg moves at dynamic speeds through Recovery and Ground Preparation phases with a powerful stretch-reflex during Transitional phase on each stride. Many drills can express a similar limb speed and can be executed without the extreme joint load during the Ground Contact phase during a maximal sprint. Examples are drills like Linear Acceleration A-skip, with all 3 aspects – Rhythm Individual, Rhythm Continuous, and Power. Note that this day is heavy volume of those types of drills, especially with offensive and defensive skill players.
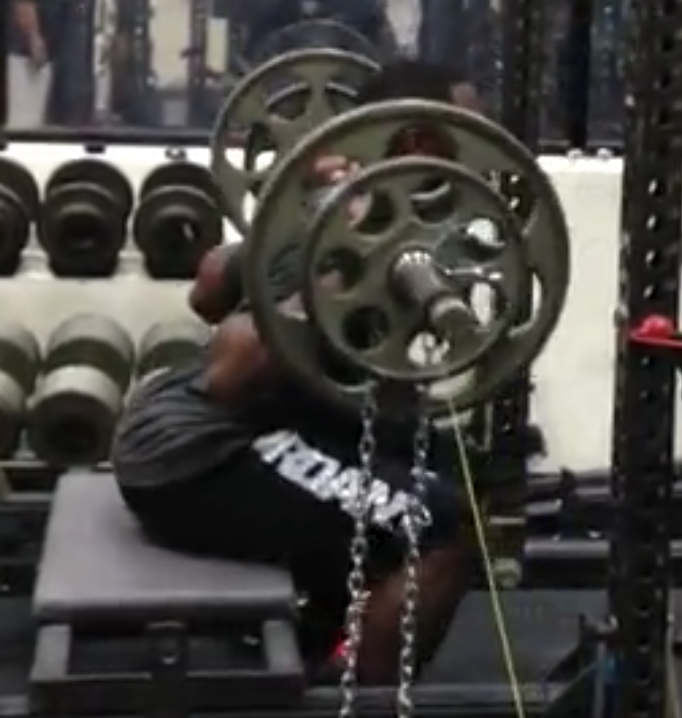
Another aspect to keep in mind for a CNS emphasis day is low-grade plyometrics. The concept of absorbing force, accepting body weight, and re-directing force during all athletic movements is discussed in great detail throughout Bommarito University (example, see Coaching Videos section with Foot/Ankle Preparation). This can be at extreme joint loading levels on maximal sprints, like seen on exercises like Resisted Linear Sprints, Pulley Assisted Over-speed Sprints, and Pulley Assisted Over-speed to Cut-Up Drill. It can also be expressed with extreme joint loads from a deceleration to re-acceleration phase – as seen for exercises like DB Backpedal to Forward Cuts, WR Cut-Up Drill, and all Acceleration-Deceleration Zones. With all Change Of Direction (COD) drills, the limb speed is great, as well as extreme joint loads. Setting the foundation for absorbing force, accepting body weight, and re-directing force can also be expressed WITHOUT extreme joint loading, which is the concept behind Agility ladder drills. These can be considered low-grade plyometric exercises that SETS THE BASE for advanced joint loading. These drills are performed as basic reflexive mechanisms, with utilization of both of the edges of the feet, and basic acceleration off of these edge-drills.
Another concept that can be extremely effective during the Monday CNS day is Power Endurance and Eccentric Loading drills. This is where drills such as the Slideboard series can be very effective. On the standard Slideboard drill of Lateral Slides, the eccentric loading into the basic stretch reflex into the lateral push can set the base for higher speed COD later in the week. The linear and lateral lunge series does a great job of loading the adductors and hip flexors in extreme joint angled positions. This type of eccentric work is valuable for really high-speed COD exercises later in the week where getting into low positions with extreme joint angles is a constant.
Sport-Specificity
Note the main difference on the Training Script between the offensive and defensive skill positions is the application of the footwork drills. After a good round of overall footwork in the Agility Ladder, there is an application portion – technically a “burst sprint” out of the last ladder rung into a designated distance (typically 4-8 yards). The defensive skill players still need to work on hip mobility and pivots, so they will plant the first step out of the ladder, pivot and turn and sprint. The offensive skill players just need to maximize their first step acceleration in a linear fashion or a multi-directional fashion (angled first step off the edge of the foot into a linear sprint). This same type of system can be utilized with MicroHurdle agility, quick foot Rapid Response drills, or basic 2-step cone cutting drills.
Linemen typically do more linear training on Monday’s. This is because they typically have Tuesday’s off running to limit the overall pounding. Plus, the linear speed they train in is usually a much shorter distance, so they don’t need the Monday to prep the CNS for an efficient linear day on Tuesday (as compared to the skill position players). If they do any footwork drills, it is typically put into the CAMPS section in a much lower volume as part of the circuit.
TUESDAY – LINEAR SPEED DAY
- High Neural loads
- High Joint Loads
- CAMPS
- Absorption Force, Accepting body weight, Re-directing force – high volume/intensity
- Continuous metabolic energy system development style of muscle prep, joint isolation, and overall mobility/stability
- Overall Training Volume – high
No matter what is constantly being argued in the profession about the necessity of linear speed training for football players, IT IS ABSOLUTEY ESSENTIAL TO OVERALL DEVELOPMENT OF FOOTBALL PLAYERS. Remember we are Performance Coaches, NOT football coaches. We are developing the CNS, developing the muscles and all of the muscle properties, developing energy systems, and developing joint integrity to withstand all of the forces across joints that will be seen in the sport/position. We are TRAINING MUSCLES, NOT RE-CREATING THE EXACT MOTIONS SEEN IN SPORT. The best way to get better at football is to play football. You can’t possibly “recreate football” in its exact sense during training. Even if you could, how much do you really want to continue to beat up the joints in the off-season by re-creating the exact same repetitive motions seen in football? As with anything related to Performance Training for any sport, the volume and intensity of each system needs to be intelligently periodized to maximize development and avoid overtraining. This includes volumes of loads places across the joints.
Think of it this way: if you run in a straight line full speed and get up to that 20+ MPH zone, there is extreme joint loads during all of the Ground Contact phases of each step. If you are moving full speed and then have to change directions, you are decelerating the weight of your body at that speed, adding in numerous additional joint forces across many joints, adding in muscle action of additional contributions of the Glenohumeral abductors and adductors, adding in additional challenges of stabilizing the foot/ankle, adding in rotational components of the femur, tibia, etc. – plus many more actions. While this is a necessary END-RESULT that should be trained, all of these sub-categories of what occurs during a change of direction can be trained and isolated individually to make the END RESULT of the actual full speed COD more efficient. Even if a drill that isolates one of these sub-categories doesn’t “look like the actual motion seen in sport”, doesn’t make it any less important to the success of this eventual END RESULT. Linear sprinting falls into MULTIPLE aspects of these “sub-categories” that will make a football-specific COD much more effective.
Here is one of MANY examples that relates linear sprinting to a football-specific COD: linear sprinting still has dynamic action of the hip during Recovery phase, a powerful stretch reflex during Transitional phase, dynamic hip extension during Ground Preparation phase, and lower-joint loading (but still effective!) during Ground Preparation phase, and high emphasis on limiting time in Residual Phase. The EXACT same phases of motion will occur on any stride coming out of a COD. Hence, training for linear acceleration will enhance each phase of motion that occurs when the limb is not in contact with the ground – developing more muscle action during these phases. This enhanced muscle action will make the phases more efficient on the step OUT OF the COD (and each succeeding step) – hence, making the overall COD a lot more effective.
Note in the Training Script that there are a lot of circuits built into the application side of this day. There is a heavy emphasis on Resisted work. Again, resisted work is not as sport specific as the actual sport of football (or free runs) because there is a longer ground contact. However, dynamic action of resisted hip/knee extension combined with the stretch-reflex in the foot/ankle joints while driving through this resistance is extremely effective at raising the threshold of stored elastic energy. This increased threshold will transfer to a more dynamic, free (non-resisted) run. Note there is a constant complex between varying modes of free work with resisted work. In a sense, we are raising the threshold, and then applying it. Then going back and raising the threshold, and applying it again. Then, repeating again. The key is the PROGRESSIVE VOLUME AND INTENSITY of the threshold-raising (resisted) systems versus the application (non-resisted) systems on a week to week basis; and periodized around weight room work so there is minimal interference.
Sport-Specificity
Note that the Linemen are off on this Linear Speed Day. Typically Lineman really only need 3 days of active movement. And they usually benefit more to going every other day (note the Monday, Wednesday, Friday). The 4thday is primary upper body energy system development, usually set on Thursday. Because the linear speed training for lineman is usually much lower volume and much shorter distances, the neural input for this style of linear training is much lower. Hence, there is some of this linear training on Monday, with a low volume of linear on the other days (Wednesday – Position work; and Friday – Metabolic conditioning)
With regards to the skill players, note that the basic script for all positions that are not lineman are very similar with regards to linear speed. This is an aggressive script that can really maximize speed, power, first step acceleration, drive phase, transition, etc. There isn’t really too much specificity that can be between offensive and defensive skill players.
When getting in the “tweener” type players (like bigger, blocking Tight Ends; bigger, run-stopping middle linebackers; bigger LB that function a lot as DE in some situations) – it’s not necessary to have a separate script. It’s usually simplistic enough to just combine the scripts.
WEDNESDAY – UNLOADED RECOVERY
- Low Neural loads
- Low Joint loads
- CAMPS (CNS Activation and Muscle/Joint Preparation Systems)
- Low and unloaded
- Overall Training Volume – low
The great thing about being in the pool is that it will unload approximately 85% of the body weight. This allows for a lot of slow isometrics for overall joint mobility and stability in the CAMPS section.
The bounding and jumping plyometrics in this unloaded day is heavy volume. While vertical and horizontal plyometrics (long response and short response) is essential to peaking power, it really loads the joints when done on dry land. While this can be an effective training method, you really want to pick your battles in terms of volume with elite level football players. A good volume of vertical plyometrics can be appropriate in the weight room setting because of landing on a plyo box will lessen the impact of the land. On dry land, it can be much more appropriate to perform jumping and bounding plyometrics in the pool because the training effect will still be expressed without the excessive joint loads. Note in the Training Script that there is a plyometric circuit of vertical jumps complexed with horizontal split cycle jumps.
The movement circuit is mainly for power endurance. The power will be expressed because of the water resistance through the phases of the sprint cycle drills. And there is a good mix of loaded technical drills complexed with completely unloaded drills with no ground contact.
Sport Specificity
Note that the linemen typically will have success in performing their Position-Specific Day on Wednesday. Their “recovery day” will be a complete day off from all lower body field work on Tuesday. For the skill positions that hit field work on Monday, Tuesday, Thursday, and Friday, there can still be a good amount of work that gets performed on Wednesday – either a complete day off, or recovery work in the pool. One of the best aspects of regeneration is active regeneration – as demonstrated in this basic pool script.
The lineman specific day is usually best utilized as complex circuits. Note that the first circuit in the Training Script is a heavy strength endurance with standard Tire Flips, followed by a specific multidirectional movement in the Hoop Drills, followed by forearm endurance with the Farmer Walks.
Basic acceleration/deceleration zones in a linear fashion will be placed between the two circuits. The zones are short, but still play an important role in overall braking and deceleration forces. Even though it’s non-specific and linear, the overall muscle preparation of eccentric loading is tremendous. This muscle preparation will continue to enhance any specific multi-directional motion.
The final circuit is extremely advanced. The acceleration and deceleration zones are put into the specific Hoop Drills to greatly intensify the challenge of the deceleration and bending motions. The Back Sled Sprint is a strength endurance to continue to really focus on the knee extensors. No matter how strong the legs get through standard strength training, there is a tremendous benefit to transferring this strength to low bending positions when the knee extensors are overloaded. Even though this looks like a “Defensive Back” drill, there is definitely a transfer of “playing low” and “bending” in and out of a lineman stance – for both Offensive and Defensive Linemen. We’ve noticed more success in the succeeding rounds of the Acceleration/Deceleration Zone Hoop drills, even though the “fatigue” factor sets in. A lot of this success can be attributed to the Re-Directing of force and the increased threshold of the knee extensors seen in the complexing Back Sled Sprint drills. Trunk and Spine Power rounds out the second Linemen Circuit.
THURSDAY – POSITION-SPECIFIC DAY
- High Neural loads
- EXTREME Joint Loads
- CAMPS
- Absorption Force, Accepting body weight, Re-directing force – low volume/intensity
- Unloaded Speed – EXTREME volume/intensity
- Overall Training Volume – EXTREME
Note that the preparation for this session is extremely specific. Instead of performing a standard “warmup” or “stretch”, it can be much more appropriate to just prep the foot/ankle, and then spend a good period of activation, and simulation of movements. There is a full “Unloaded Speed Preparation” in the Coaching Video section of BPSU. This is the day that can utilize this entire script as a very appropriate preparation to the training day.
The Defensive skill players begin their day on the Training Script with the Back Lunge Series. This is the ultimate preparation system for all backwards motions. It really transfers well to BackPedal (BP) and AnglePedal-Weave (AP) motions because of the overload at absorbing and re-directing force at such extreme ankle dorsiflexed positions. The first BP/AP to change of direction (COD) circuit focuses on forward cuts. Because the Back Sled Sprint drill does such a good job of overloading the re-direction of force, it can be appropriately placed in this circuit as a complex. Remember that the forward cut motion relies heavily on the re-direction of force at extreme angles.
For defensive players, the acceleration/deceleration zones in a linear fashion will precede the final BP/AP COD Circuit, which focuses on Back Cuts – which utilizes more of a hip pivot than an extreme re-direction of force (as seen in the forward cuts). One interesting complex that is proven to be very effective is a few Assisted Over-speed Acceleration sprints that can conveniently precede the final circuit. Most defensive skill players (especially Defensive Backs) can benefit greatly from increasing stride length through this extreme horizontal plyometric-based exercise. There can be a tremendous transfer to the Back Cut series, because the sprint motion off of the hip pivot usually requires a full speed linear acceleration.
Note that the offensive skill players are setup very similar to the defensive systems. The same CAMPS system is used. The main difference happens upon the continued preparation. Note in the Training Script, offensive players now focuses on stabilizing the trunk/spine through rotation with the Single Arm Sled Marches. This is followed by absolute speed technical mechanics, and some general free acceleration sprints. Then, the first specificity circuit begins with heavy joint loading with inside-edge and outside edge change-of-direction (COD) drills with the Pattern Tree Cut-Up drill. A basic form is the single cut; with advanced challenges in the double cut. The same Acceleration/Deceleration zones as the defensive skill players are performed next. With the same concept – overload the braking and deceleration forces and intensify the re-direction of force into the re-acceleration. Putting a basic acceleration/deceleration zone on the front of it then intensifies the Cut-up drill series. The speed into the first cut will be at an extreme speed, which overloads the challenge of the edge cut. Note that the same Pulley Assisted Over-speed can be placed towards the end. Offensive players really benefit from performing a basic Cut-up off of the end of the assisted acceleration run.
One important point is that for any skill player performing an Assisted Over-speed run, there must be a great deal of preparation and limiting asymmetries in any joint. Not every player gets to this phase, even after a solid foundation is prepared in the 3 preceding macrocycles. If an athlete is ready, ensure that the day begins with stabilization of the trunk (most commonly used with success is the Single Arm Sled March). Because this advanced system of training is more commonly beneficial to offensive players, the day begins with this stabilization exercise sequence.
The Lineman on this day completely unloads their legs. This continues with the concept of running every other day. Since the heavy position day was Wednesday, the specific of linemen can now focus on the upper body. Remember that linemen are combat athletes. The endurance and power endurance of the upper body is one of the most underrated and under-utilized systems in their entire overall development of all combat athletes. The battle ropes is pure power endurance and grip endurance. The Tunch Punch will focus on hand speed, punching technique and power, and power endurance. The Landmine Jammer is resisted punching endurance and power endurance. And the Band Jammer is setup as the most specific in terms of the actual punching motion. The Band Jammer is also efficient at peaking power because of the accommodating resistance of the band.
FRIDAY – METABOLIC CONDITIONING
- Low Neural loads
- Medium Joint Loads
- CAMPS
- Absorption Force, Accepting body weight, Re-directing force – low volume/intensity
- Very specific and targeted muscle preparation, joint isolation, and overall mobility/stability
- Overall Training Volume – medium to high
There are varying forms of Energy System Development (ESD) that can be appropriate for football players from a metabolic standpoint. These are some efficient examples that can be used over the course of an off-season:
- Standard quantified and progressive interval training
- Varied quantified and progressive interval training
- Localized Strength Endurance
- Unloaded machine-based interval training or aerobic base development
The Training Script focuses on Localized Strength Endurance. This is an extremely underrated form of overall development for football players. From a football standpoint, it is not that difficult to develop and maximize the cardiovascular and respiratory systems. Basic interval training the focuses on Power and Power Endurance in a fatigued state is important, but doesn’t’ need to be as much of an emphasis as many programs show. Further, much of this specific interval work is developed in the other days; even though there are speed and position drills. The work:rest ratio on Monday, Tuesday, and Thursday dictates the varying energy systems to be developed; so it doesn’t necessarily always have to be replicated on the Conditioning Friday.
Think about it from this example: the Hip Extensors can get strong and powerful in the weight room, but what about repeated bouts of strength? Local muscular fatigue is very common in football; much more then simply “being out of breath.” For the strength to transfer efficiently, utilizing strength endurance exercises like basic Sled March forward can be very appropriate. When executing the Sled March, the foot is placed in from the of the center of mass, with the heel striking first, then the emphasis of moving the sled forward is placed on concentric hip extension. This repeated bout of controlled marching for specified distances is a great example of specific, localized Strength Endurance. Note in the Script that there is a progressive increasing load of increased distances.
For skill position players, there still is a good technical phase after CAMPS that is focused on acceleration and absolute speed. The linemen are more focused on resisted acceleration work in extreme joint positions (see the low sled push work). The linemen didn’t have a full day focused completely on linear speed like the skill players, so they finish up their volume of linear speed work before the conditioning starts. The skill players need more overall sprint volume in the week, so the high volume of technical drills works well on the Conditioning Friday.
PROGRESSIVE OVERLOAD
This Training Script is based around one sample week of an entire macrocycle. Many examples are shown here about how to rotate from week to week. As with any intelligent weight room program, the volume and intensity and choices of exercises with speed and movement needs to be planned and periodized carefully. The theme of each day will remain constant. However the overall volume of the following aspects needs to be considered when building the overall macrocycle:
- Unloaded-joint training versus Loaded-joint volume
- Technical versus Application drills
- Time on each aspect of CAMPS
- Resisted versus Free (non-resisted) work
- Assisted versus Free (non-assisted) work
- Joint Preparation and Stabilization and minimizing assymetries versus Assisted work
- Weekly and overall volume of specific and/or multidirectional work
- Rotating the metabolic ESD emphasis weekly
- Volume of the various forms of ESD, and rotating the work:rest ratios – on EACH day, not just the Conditioning Friday
- Minimizing interference with weight room development
- Volume of Power to Power endurance work
- Volume of Strength to Strength endurance work
- Unplanned periodization changes based on readiness to train
This basic Training Script is a great start to a method for all elite and professional football players. It has been shown to be extremely effective at the elite high school, collegiate, and professional levels. However, as with any program – it’s the overall manipulation of the variables that is directly related to the success.